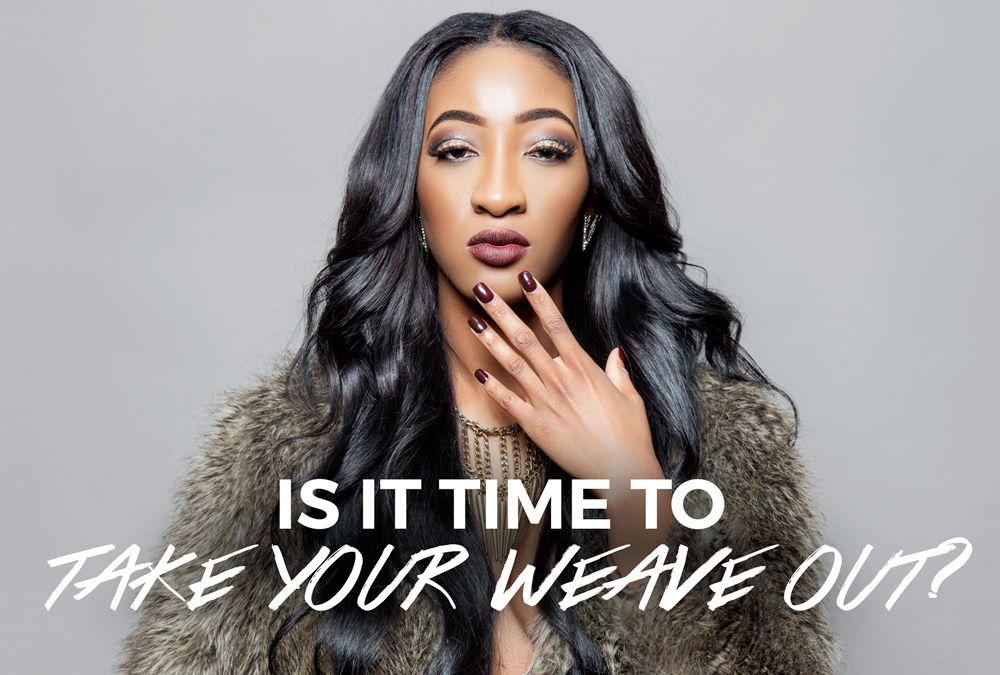
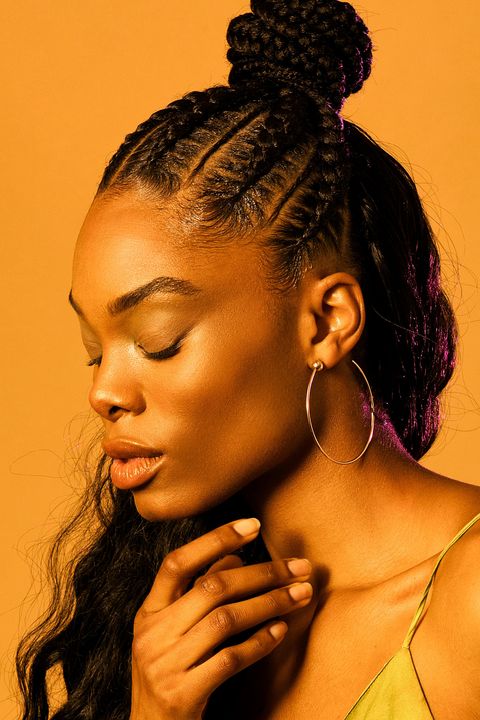
How To Weave Hair
How To Weave Hair enlist the assistance of extensions, extensions and weaves to make them occur.
hair weave is a wonderful means to blend your style, and also provide your appearance a new bit of flair. If you’re not able or interested in mosting likely to a beauty parlor to have your weave done, you can do it yourself at home with the right devices. Get your hair, obtain your hands prepared, as well as you’ll be set for a weave that will certainly make all your pals jealous.
Tutorial 1 – How To Weave Hair
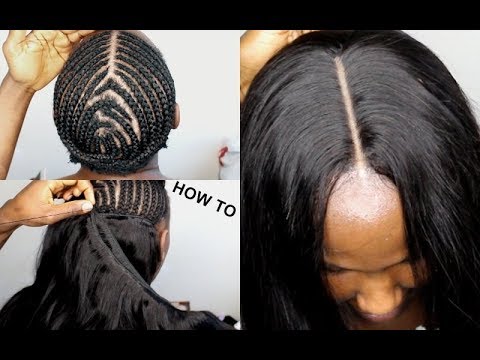
Part 1 – Producing Your Base Pigtails
Step 1
Laundry and condition your hair. You need to always prepare your hair for cornrows/weave before implementing the design. Clean your hair as you normally do, as well as provide it an excellent conditioning therapy too. Make sure that your hair is totally completely dry before beginning the cornrow process.
Step 2
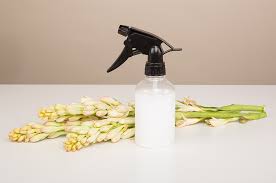
Gather the required supplies. To develop the base to sew your weave onto, you need to intertwine your head in a series of cornrows. To do this, you’ll require a large tooth comb, a great tooth comb, and a hair pick. You will also need 2 to 3 large hairpin to hold your hair away from your face, and also a detangling spray of some kind (3 parts water mixed with 1 part oil in a spray container functions well).
Step 3
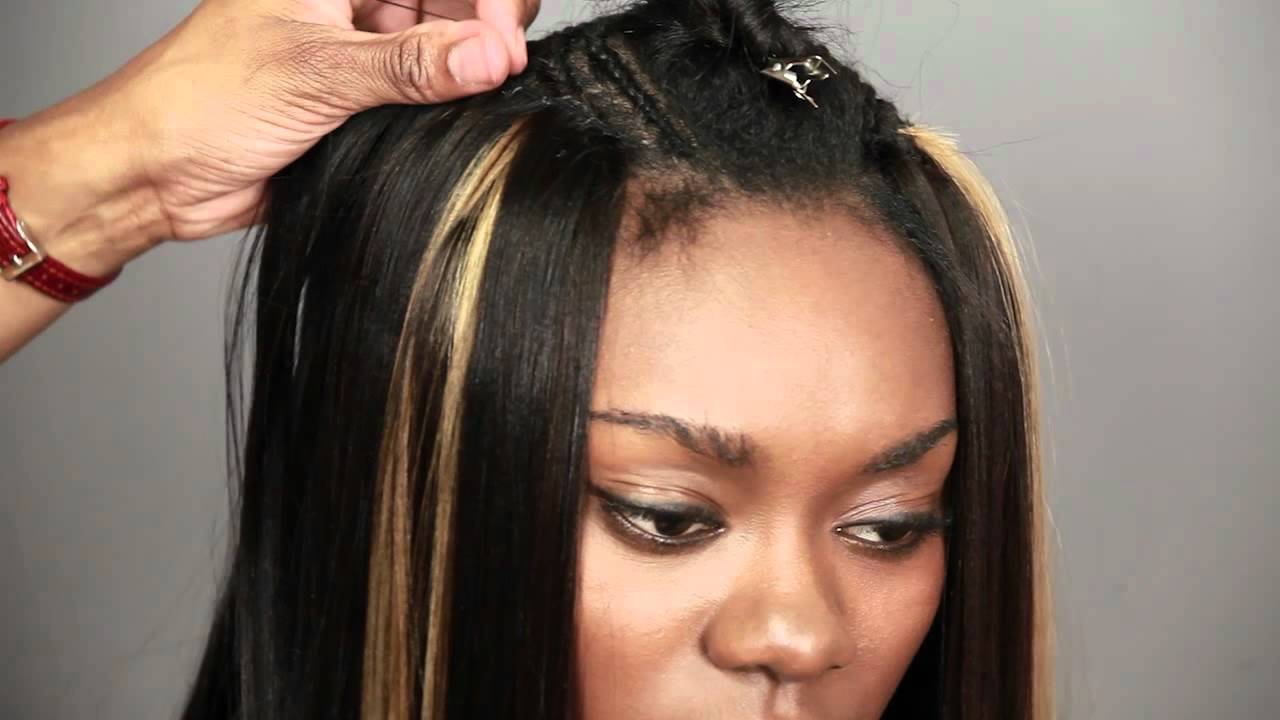
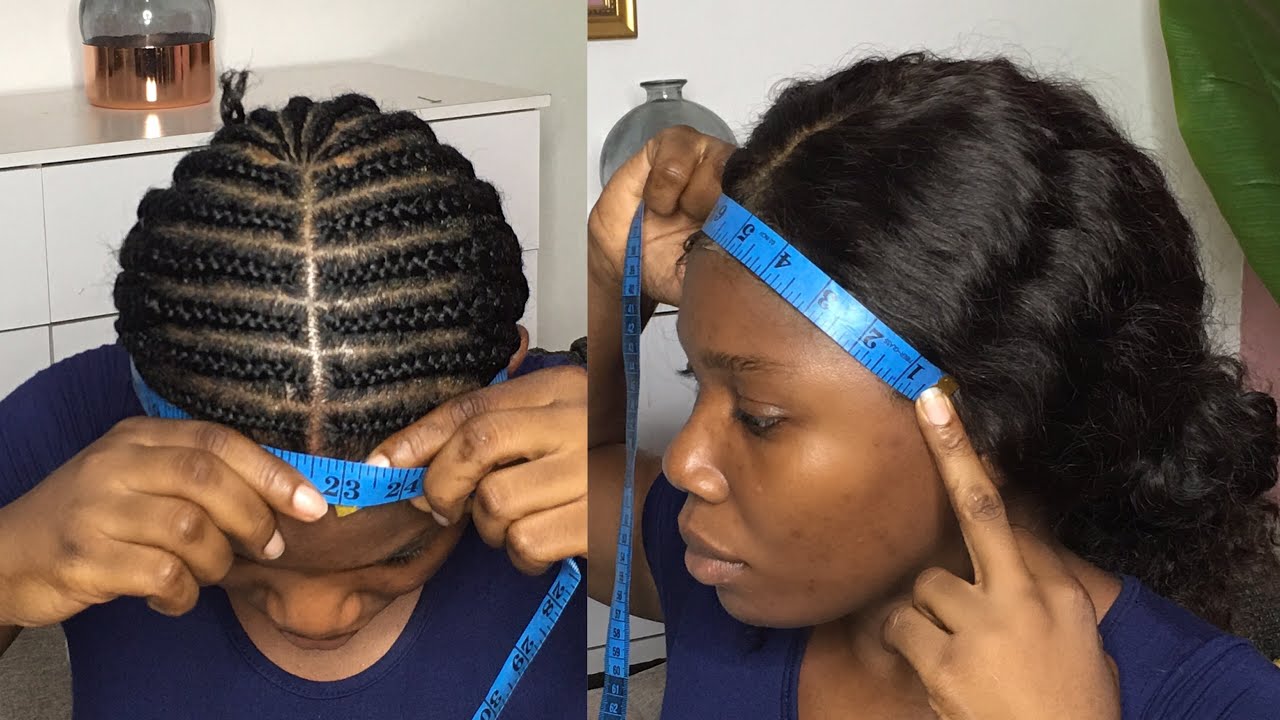
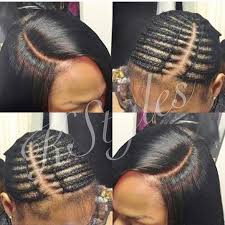
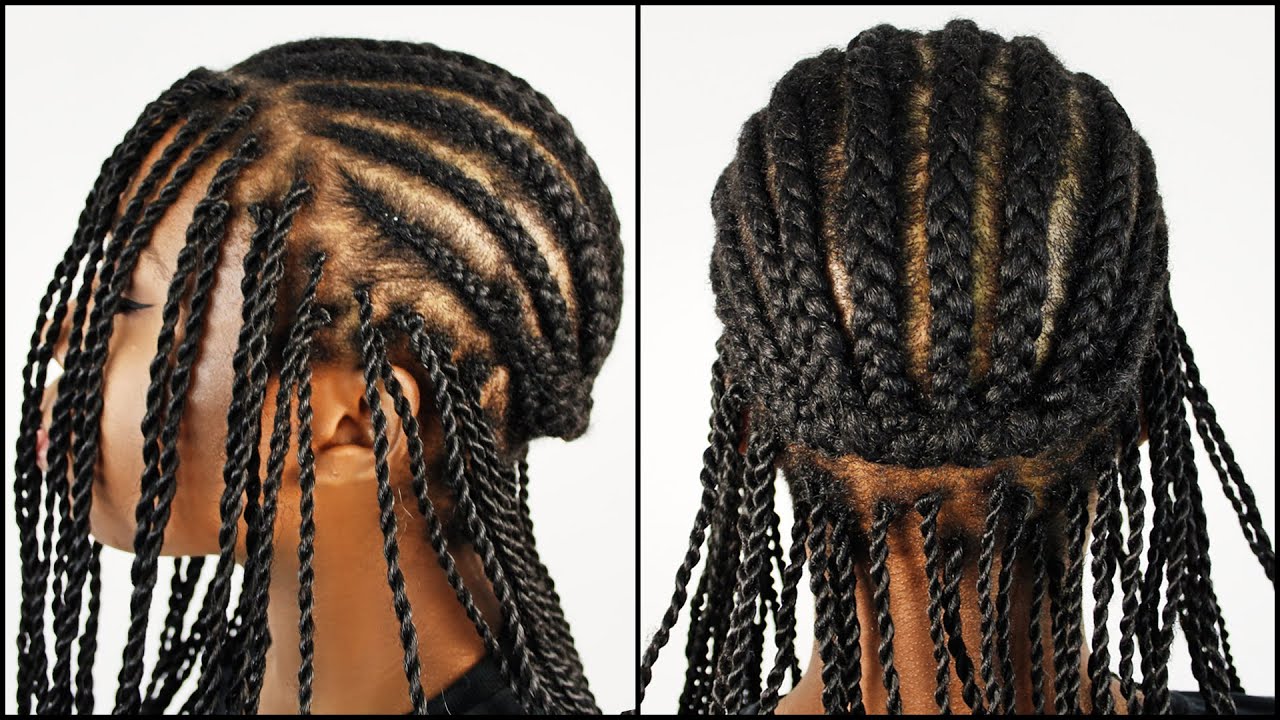
Select your component. When you add your weave, you’ll put it in layers around a component in your all-natural hair. Your component is the subjected area of the scalp, as well as is typically located down the facility of your head or slightly off-center. Choose the area of the component very carefully due to the fact that you will not have the ability to transform it until you take out the weave. Separate out 0.5 in (1.3 cm) sections of hair on either side of it. Pin the remainder of your hair back utilizing the clips.
Your component only requires to go about midway back on your head.
Step 4
Braid the border row. The first braid you will certainly complete is a little braid that twists around the external side of your face, head, and to the nape of your neck. The boundary braid will certainly have 2 begins – on either side of the part – but you will incorporate completions of the pigtails with each other at the nape of your neck. Take your hair out of the hair clips, and section off a hair of hair 0.25 to 0.5 in (0.64 to 1.27 centimeters) thick completely around the external edge of your head. Beginning with the edge-braid from your part, braid as for you can around the side of your head. Then, do the very same beyond.
You might combine the boundary braids off to the side as opposed to straight in the fixate the nape of your neck, if your component is off-center.
Keep the braid as tight as you can, and as near to your scalp as you’re able.
Step 5
Begin intertwining your part. To reveal your component, you will certainly entwine two rows of hair on either side of the part, away from each other. Start with among the 0.5 in (1.3 centimeters) areas of hair, as well as separate a small item about 0.25 in (0.64 cm) thick on one of completions. Entwine this in a French pigtail in the direction of the back of your head on the one side of the component. Braid this strand about 2/3 of the way down, leaving completions loosened (they will certainly be incorporated right into a larger pigtail in the future).
Step 6
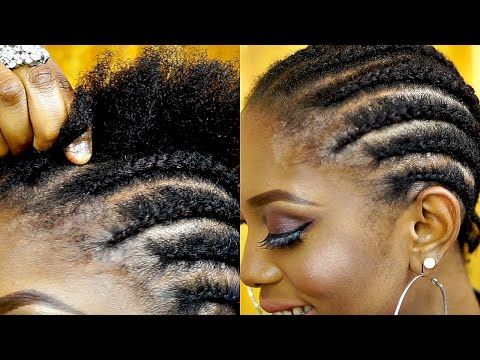
Finish intertwining your part. Work down both sides of the component, intertwining tiny French pigtails 0.25 in (0.64 cm) large. Bear in mind that the pigtails should run alongside your component and you need to work down your head in horizontal sections. Due to the fact that you will not have the ability to French pigtail each strand right, the ends ought to be loose after you have actually intertwined all the hair near the scalp. Each of the strands that are loose will certainly be the beginning of a row of braids copulating around your head.
Step 7
Start the center braids. Each of the braids you started on either side of your component will certainly advance to develop full braids that wrap around your head. This indicates that from a birds-eye-view of your finished head, there will certainly be concentric circles developed around your part. Comply with the pattern of the boundary pigtail, by sectioning off slices of hair around the external side as well as operating in. Most likely to the following braid closest to your hairline, and also braid on either side of your part in the direction of the rear of your head.
Proceed spraying your hair with the oil/water mix or your detangle spray to make entwining less complicated.
Your pigtails ought to be really tight and also might injure while intertwining, however shouldn’t be painful when completed.
The braids will likely end up being fairly thick about halfway with, due to all the hair you collect. Don’t be stressed if due to this your braids are uneven.
Step 8
Complete your braids. Job inwards on your braids, far from your component. Each of the little braids you started on either side of your component need to work as the start for every brand-new braid. If you lack part-braids however, you can produce a lot more near the part on the back of your head. Link off all completions and also tuck them into/under the ended up braids so as to conceal the tails.
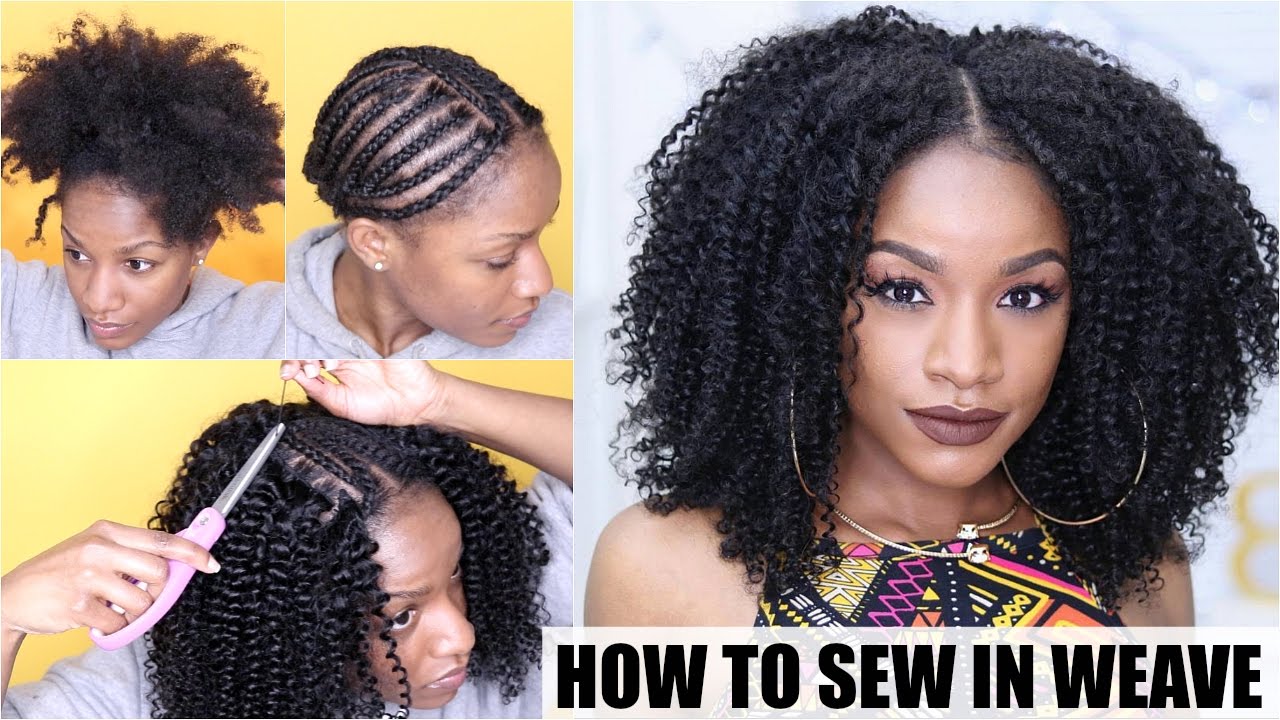
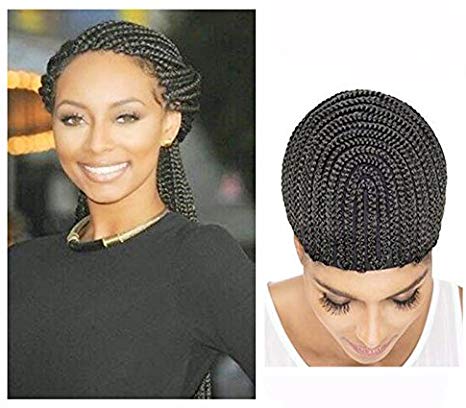
Part 2 – Embroidery on Your Wig Cap
Step 1
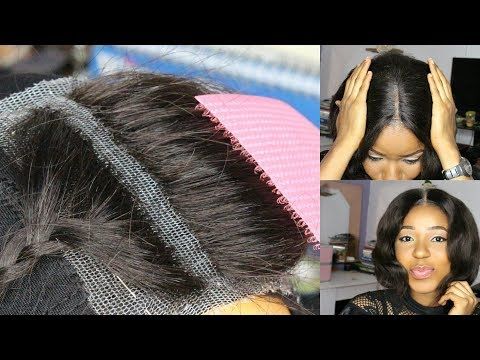
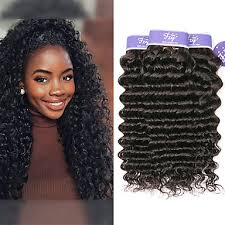
Get all of your supplies. For your weave, you’ll at demand at least two packages of wefts of human hair in a shade collaborating your all-natural hue. You’ll likewise need curved embroidery needles, weave thread that matches the hair shade, a wig cap, and also a choice or great tooth comb for dividing sections of hair. When you complete weaving in a weft of hair, you’ll reduce the excess with a set of shears, so have those handy as well.
Step 2
Prepare your needle and string. Obtain your unique weave-thread out, as well as reduced an item that is 2– 3 feet (0.6– 0.9 m) long. Thread one end of the string via your needle, and draw it to make sure that both ends are also. After that, wrap the ends of the thread around the pointer of your finger, as well as link them with each other in a knot. This will certainly form a loop on which your needle is strung. Cut the excess string off that is left over from tying your knot; try to suffice as near the knot as you are able, so as to make it as discreet as possible when woven right into your hair.
Do not reduce excessive thread to begin, as the longer your string, the even more tangles and knots that are likely to be created.
You’ll possibly lack thread usually, so you’ll have to duplicate the previously mentioned procedure each time that takes place.
Step 3
Place on your wig cap. Pull your wig cap out and also stretch it out, moving it over your head. Cover your entire hairline right around; the wig cap need to go over your ears, forehead, and the nape of your neck as little bit so regarding ensure your pigtails are entirely covered.
Step 4
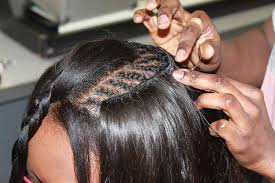
Start stitching your wig cap to your braids. Begin at the beginning of your boundary braid near the component, and also pull the needle under the pigtail and also with the opposite side, pulling the string tight against the knot. Then, pull completion of the knot out simply a bit and also pull the two strings apart to subject the loop. Wrap the needle around one edge of the loop two times, and also pull it through the facility of the loop to produce the base knot.
Step 5
Sew the wig cap to the perimeter braid. Procedure regarding 1-inch down the boundary braid from the initial knot you made, as well as repeat the process. Hook the needle under the pigtail, draw it through the opposite, and also pull to draw the loosened thread tight. Prior to the thread between the two knots has been tightened up right though, wrap the needle around it twice near where you placed it, and also draw tight. This will provide you your 2nd knot. Repeat this same procedure completely around the perimeter pigtail.
Each knot should have to do with 1 inch (2.5 centimeters) apart from each other.
Make certain that your knots as well as thread are pulled tight, to ensure that your cap is firmly affixed to your braids.
Step 6
Sew the wig cap around your part. When you have actually stitched the wig cap around the boundary braid, you’ll complete the ‘loophole’ by stitching around the outside of your component. Starting from your last knot on the boundary pigtail, avoid approximately the following row of pigtails on your head. Repeat the knot-tying procedure, and afterwards go up to the next row. By the time you’ve stitched around the component, you need to have a big ‘U’ form of knots. Ensure that each knot goes to least 1-inch away from the facility component. Round off by connecting two knots at the base of your stitching, where you began on the border pigtail.
The finishing knots ought to be the same as the other knots you have actually been sewing the whole time.
Cut the extra string off as near to the knot as you are able, without reducing the knot.
Step 7
Cut off the excess wig cap. Take your shears and cut up along your part to split the wig cap. You’ll be eliminating all the excess fabric around the edge of your sewing (the part that looked at your forehead, ears, nape of your neck, and the covers your part). When you’ve cut up your part, cut all the added material off as close to the edge of your thread as possible, without getting close enough to cut the knots.
If you inadvertently cut the thread or a knot, you’ll need to remove what job you’ve done and start over with a brand-new wig cap.
Part 3 – Embroidery on Your Expansions
Step 1
Measure your extension-hair for the perimeter braid. The initial expansion that you will gauge and also apply is the item that goes around the perimeter. Take your extensions out of the plan, and open one weft to make sure that all the hair is exposed. Beginning at the beginning of your boundary pigtail, hold the expansion in place, as well as wrap it around your head. Hold it to the perimeter intertwined the entire time to ensure it is the ideal size. When you reach the end of the border braid on the other side, determine a little extra hair, and afterwards trim it to fit.
Location this piece of perimeter-extension off sideways, to make sure that you do not misplace it or perplex it for one more area of hair.
Step 2
Action the extension to go around the beyond your component. The second significant area of hair you need to determine is the piece that will certainly walk around the ‘U’ shape of your component. Hold completion of the expansion over the beginning of the ‘U’ designed part near your temple, and also wrap it around where you have currently knotted. When you reach completion beyond (back to your temple), add a little additional length to your measurement, and afterwards reduced the piece of extension.
Keep track of this extension, as well as ensure you do not confuse it with the perimeter extension.
Step 3
Prepare your thread. You’re going to be dealing with a lengthy strip of extension, yet you won’t be able to utilize all the needed string in a solitary shot. Cut an item of your weave thread that is 5– 6 feet (1.5– 1.8 m) long, and also make use of the very same procedure as you provided for your wig cap by threading it with the needle, matching the ends, and also tying them with each other in a knot. Cut off any excess string.
Step 4
Create your base knot via the weft of the extension. Every single time you area out a new item of expansion to stitch on, you’ll have to develop a knot to protect it. The extension is comprised of two primary components: the strands of hair, and the weft which holds them with each other. Stick your needle via the weft at the very beginning of the extension to protect it. To link your initial knot, you’ll cover the needle about, draw it through the weft a 2nd time, cover the loophole that is formed around the needle twice, and draw the needle with.
The binding procedure entailed coincides as you utilized to sew your wig cap to your cornrows.
You need to have plenty of excess string when you’re finished tying your not; do not cut this, as you will be using it to weave your expansion to your head.
Step 5
Start stitching the extension to your wig cap. Beginning at the very beginning of your boundary pigtail near your component, and insert the needle through the wig cap, under the border pigtail, and also up via the opposite side. Pull it tight to bring your extension piece near to your head. Then, make your initial knot by covering the needle/thread around the weft (not through it) and repeating the same knotting procedure as you used for sewing your cap. Repeat your knot twice to safeguard the expansion.
You’ll only double-knot the expansion at the very beginning.
Step 6
Continue embroidery your perimeter expansion. Utilizing the precise very same process as you did to sew on the wig cap, work around your head stitching on the expansions that connect to the perimeter braid. Make each knot regarding 1-inch apart, and hold the expansions tight to ensure that they are firmly connected to your head. Do this right around your border braid until you have actually made it to the very end, on the contrary side of your part.
Take care not to link hairs of hair right into the knot.
Trim off any excess that you might have as soon as you have completed stitching on the perimeter expansion.
Step 7
Stitch your extension around the outside of your part. To round off the ‘boundary’ of your hair, you’ll have to sew your expansion item around the side of the ‘U’ form that your wig cap kinds around your part. Start by preparing a brand-new piece of thread as well as connecting it throughout of the weft. Then make use of the precise same process as clarified over to stitch the expansion to the braids/wig cap around your part.
Cut off any type of extra that you may have at the end.
Step 8
Begin filling in the remainder of your head with the expansions. Beginning at the second row of pigtails (the second to the perimeter braids) you must begin completing the space on your head with the rest of your expansions. Proceed the very same process as above, other than that when you reach completion of your row (on the opposite side of the border pigtail), you need to make use of the ‘fold over’ method to start an extra row. This means that instead of removing the excess extension when you get to the end of a row, you fold it back on itself and also start sewing the brand-new row directly over it.
Always sew a knot directly over a layer when you fold over a section, in order to make it lay flat. It is practical to do this twice, to ensure it is 100% safe.
Don’t gauge as well as cut your pieces prior to sewing added rows, due to the fact that the fold-over method will make it simpler to continue collaborating with the very same weft for a large section of your head.
Step 9
Finish filling in your head. Job around your head, using the exact same procedure of sewing your weave to your cap/braids as you have actually been. Bear in mind to constantly dual knot over a layer or the start of a weft, to correctly protect it. When you have ended up filling in your head, cut off any kind of unwanted that may hang over the front.
Step 10
Sew on your closure for your component. If you’ve done every one of your embroidery appropriately up until now, you need to be entrusted to concerning 1-inch of exposed pigtails all the way around your component. Stitching your weave onto this section resembles when you originally entwined it, as you will certainly be collaborating with little areas away from the part. Step the subjected pigtail, as well as cut off the very same amount of your weave. Stitch each tiny section (concerning 1-inch vast) onto the revealed pigtail. This indicates that you will have many little items to sew, and also each must run rather alongside your temple. Use the exact very same procedure, seeing to it to double-knot both the beginning and end of each string.
It could be practical to have several needles with string prepared prior to beginning this, because you’ll be dealing with a lot of little items of weave which may be difficult to do with a solitary lengthy item of string.
As the layers develop, your part ought to look a growing number of all-natural, and also the weft of each piece of extension should begin to be concealed.
Step 11
Develop your closure for the rear of your part. When you have actually stitched on extensions to all the tiny braids along your part, you should be entrusted to a room in the back that is still open. To load this in, you’ll have to prepare a special item of your weave. Procedure the space that you need to fill up, as well as reduced an item of your weave that is twice that length. Start with your regular double knot at the end, and then roll the weave in to create a little circle. Create an added knot by looping around the two split areas of weft, as well as pulling it tight. Continue rolling and binding the expansion up until you have ended up the entire piece.
When you tie the last knot, draw the needle with all of the split wefts to safeguard them together.
Cut the excess string off when you’re finished tying it.
Step 12
Change your closure piece. Turn your closure item upside down to make sure that the weft is dealing with the ground, and the hair is up. Start flattening the hair to ensure that it drops over the top of the rolled up weft. Due to the roll that you developed, the hair ought to fall evenly around it, hiding the weft and also your sewing. It may be practical to utilize a flat iron on the hair to get it to accept what you’re trying to get it to do.
Secure completions of the hair with a little elastic to making sewing it to your scalp much easier.
Step 13
Sew your closure to your head. Transform your closure item back over to make sure that the weft is exposed, and also put your needle as well as thread with it to link your regular dual knot. Bring your closure to your scalp, and location it where you want it to go. Place your needle through a pigtail or a piece of weft from another expansion close by on your scalp, as well as pull it limited to create your regular knot. Proceed doing this in a circular motion around your closure item, until you’ve gotten back to the start.
Cut off the excess string, eliminate the elastic from your hair, as well as you’re done!
Change the hairs of your closure piece to cover any type of weft that might show up.
Step 14
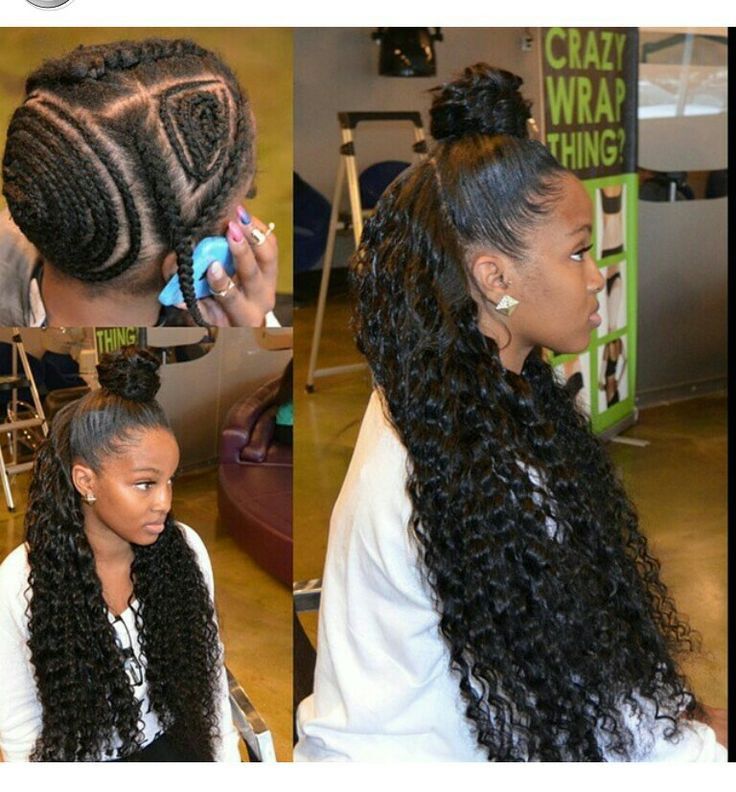
Cut and also design your weave. Connecting your weave to your head is currently completed, so you have the option of cutting as well as styling it to your individual choice. Bear in mind that your cut is irreversible since your hair isn’t going to expand in, so be very cautious about reducing your hair. Maintain your weave consistently, yet avoid cleaning it frequently as this may relax the connections and also your wig cap.
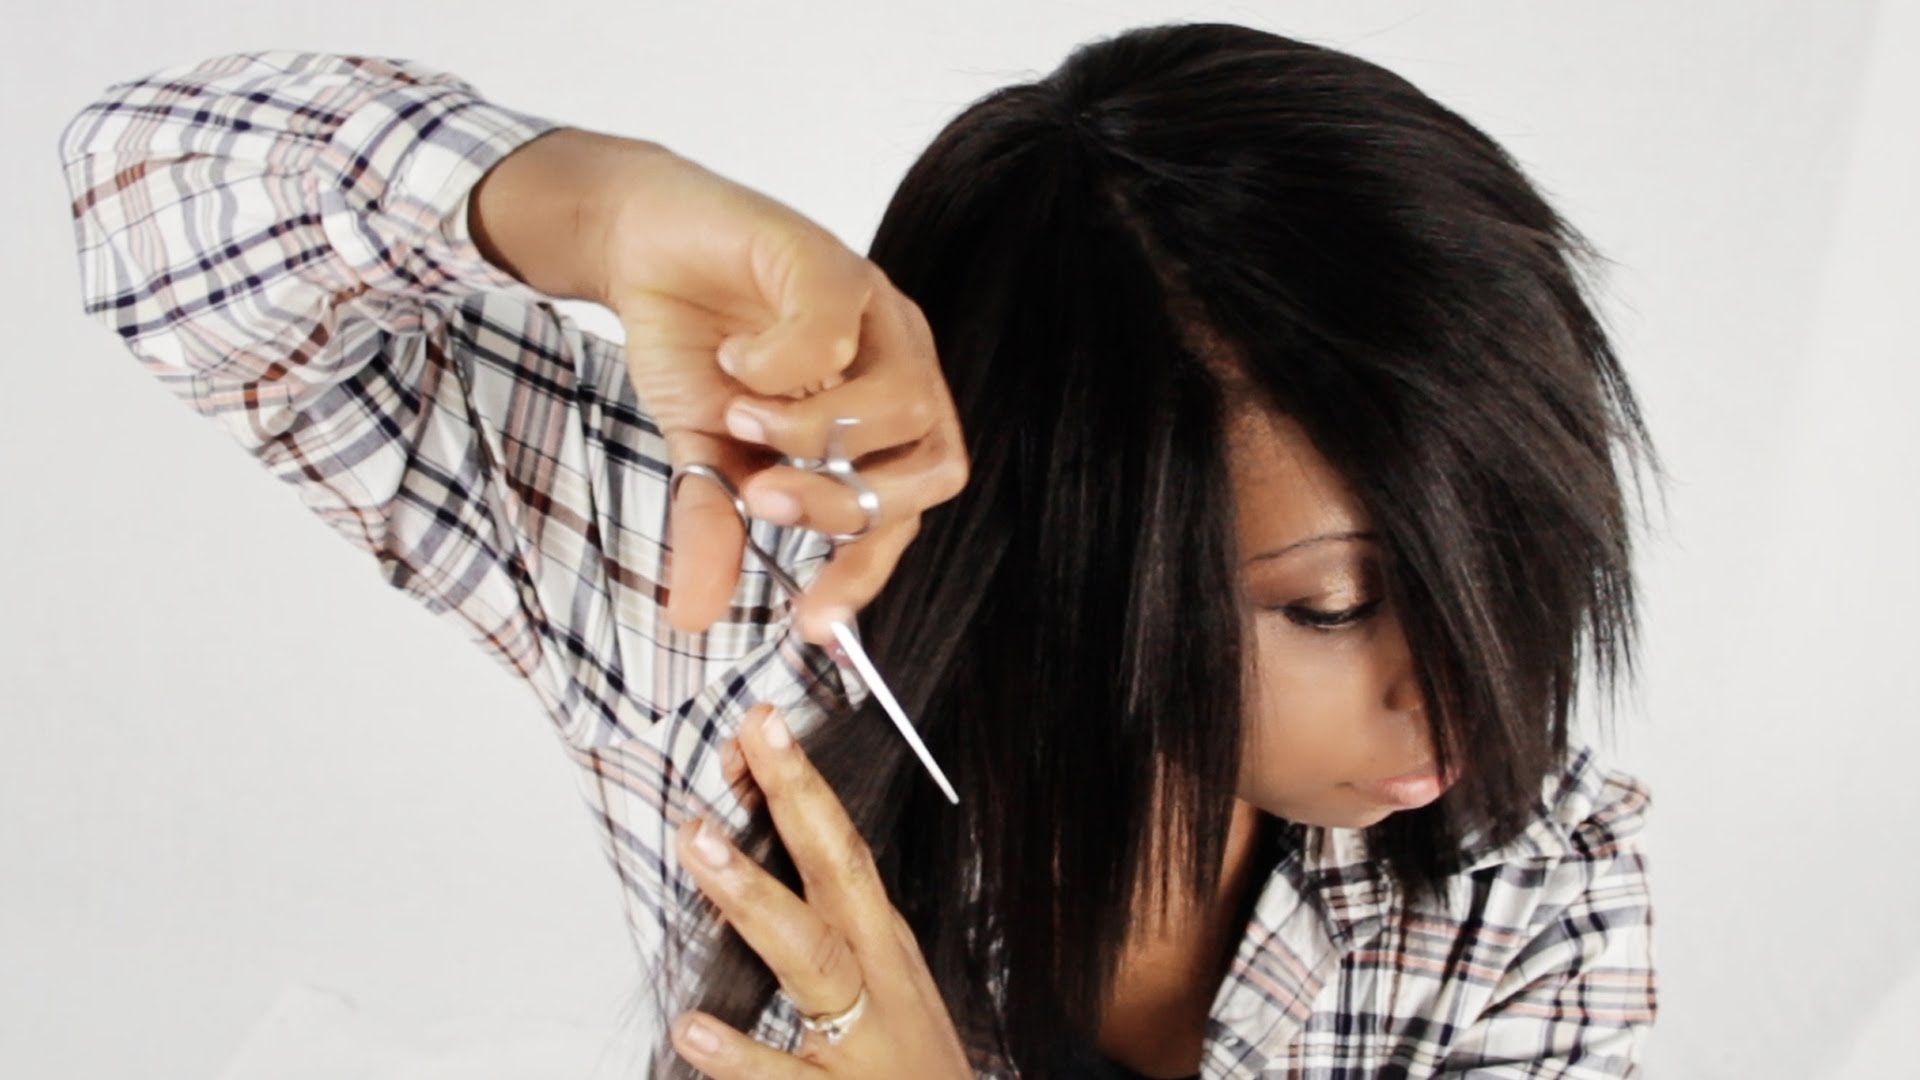
Factor reducing your ends is a fantastic means to reduce mass and also get some structure right into completions of your weave. Hold the scissors vertical to the ends of your hair and make some 0.5 in (1.3 centimeters) cuts into the ends.
How to wash human hair weave?
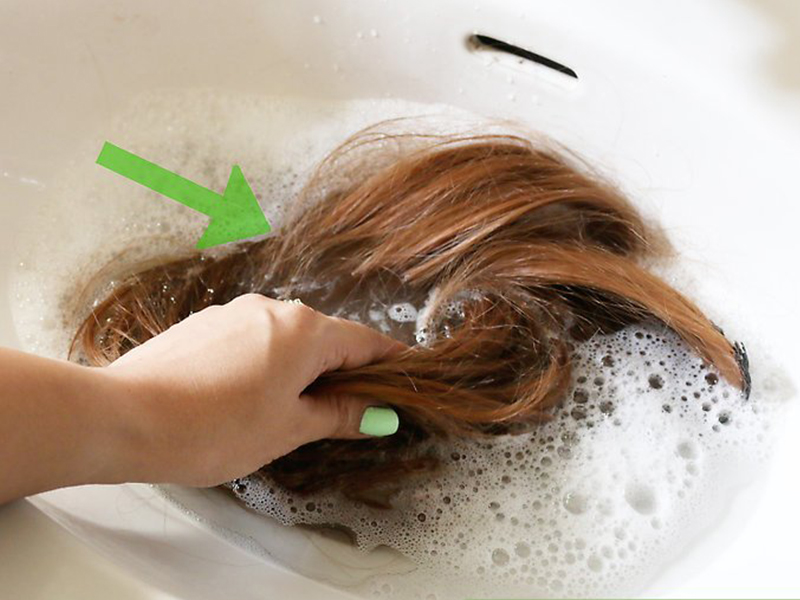
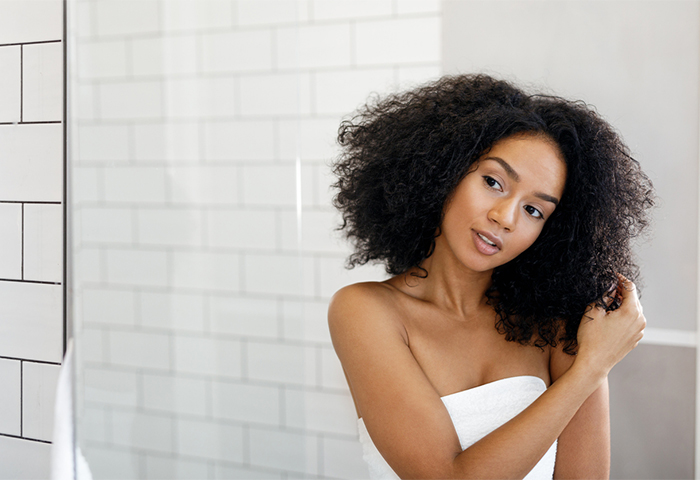
How to wash human hair weave? – Wearing excellent quality human hair weaves may provide you a silky sleek hairstyle and supply you with a fresh, fun appearance. On the other hand, the weave will not remain silky smooth without just a small maintenance.
Whether you’ve got a leave-in or leave-out weave, then you will want to detangle shampoo, and state your glow, then let it dry thoroughly. Additionally, keep your glow looking great by setting a fantastic hair care routine.
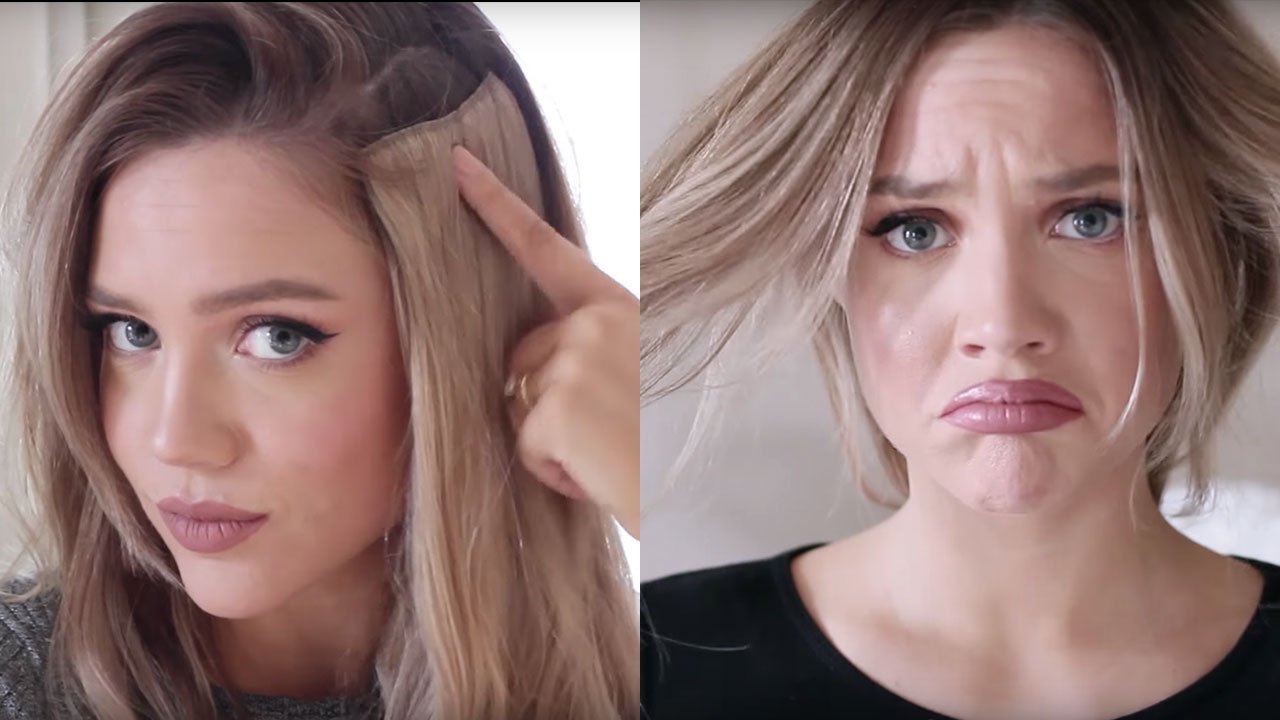
Tutorial 2 with Images- How to weave hair extensions
How to weave hair extensions, make your hands prepared, and you will be set for a glow which will make all of your friends envious.
A fresh hair is a excellent way to combine your personality, and give your appearance a fresh piece of flair. If you are unable or interested in visiting a salon to get your weave done, you can do it yourself at home using the ideal tools.
How To Weave Hair package to your own needle and thread, insert the curved needle beneath the hair and bring this up.
The best way to How To Weave Hair Extensions, so create your palms ready, and you’ll be put for a glow that can make each one your friends envious. A new hair weave is also a superb way to blend your character, and give your look a new slice of flair. If you’re not able or interested in seeing a salon to get your Weave Hair Extensions done, you may do it at home working with the perfect tools.
Making Your Base Braids
Wash and condition your hair
You should always prepare your own hair for cornrows/weave before implementing the style. Wash your hair as you usually do, and give it a fantastic conditioning treatment as well. Make certain that your hair is totally dry before beginning the cornrow procedure.
Collect the necessary equipment
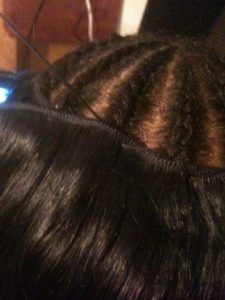
To produce the base to sew your Weave Hair Extensions onto, you have to braid your head in a series of cornrows. When you put in your glow, you are going to place it in layers around part on your natural hair. Your part is the exposed area of the scalp, and is typically located down the center of your head or marginally off-center. Choose the location of this part carefully since you won’t be able to change it before you take out the weave. Separate out 0.5 in (1.3 cm) segments of hair on either side of it. Pin the remainder of your hair back using the clips.

The first braid you may complete is a little braid that wraps around the outer border of your own face, head, and into the nape of the neck. The perimeter braid will have two starts – on either side of the part – but you will unite the ends of the braids together in the nape of your neck. Take your hair out of your hair clips, and then section off a strand of hair 0.25 to 0.5 in (0.64 to 1.27 cm) thick all the way around the outer edge of your mind. Beginning with the edge-braid out of your area, braid as far as you can round the edge of your head. Then, do the exact same on the other side.
Begin braiding your own part
To demonstrate your part, you may braid two rows of hair on both sides of the part, away from each other. Braid this at a French braid to the rear of your mind on the one side of the part. Braid this strand about 2/3 of their way down, leaving the ends loose (they’ll be incorporated into a larger braid in the future ).
Finish braiding your own part
Bear in mind that the braids must run parallel to a part and you should work down your mind in horizontal sections. Because you won’t be able to French braid each strand all the way, the ends should be loose once you’ve braided all the hair close to the scalp. Each of the strands that are loose are the start of a row of braids going all the way around your head.
Begin the center braids.
Each of those braids you started on both sides of your part will last on to form complete braids that wrap around your head. This means that by a birds-eye-view of your finished head, there will be concentric circles formed around your part. Follow the design of this perimeter braid, by sectioning off thin pieces of hair around the outer border and functioning. Proceed to the next braid closest into a hairline, and braid on either side of your part towards the back of your mind.
Continue spraying your hair with the oil/water mixture or your own detangler spray to make braiding easier.
Your braids must be quite tight and might hurt while braiding, but shouldn’t be painful when finished. Do not be worried if because of this your braids are irregular.
End your braids.

Work inwards in your braids away from the part. Every one of those tiny braids you began on either side of your part ought to function as the start for every new braid. Should you run out of part-braids however, it is possible to create more near the area on the back of your head. Tie off all the ends and tuck them into/under the completed braids so as to conceal the tails.
Sewing on Your Wig Cap
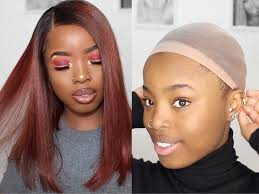
Get all of your supplies.

For your own weave, you will at need at least two packages of wefts of human hair at a color coordinating your natural color. You’ll also need curved sewing needles, Weave Hair Extensions thread that matches the hair color, a wig cap, and a select or fine tooth comb for dividing sections of hair. When you finish pruning in a weft of hair, you’ll cut the excess using a set of shears, so have those available as well.
Train your needle and thread.
Get your special weave-thread outside, and cut a piece that’s 2–3 ft (0.6–0.9 m) long. Thread 1 end of the series through your needle, and then pull it so both ends are even. Then, wrap the ends of the thread around the tip of the finger, and tie them together in a knot. This may form a loop on which your needle is coated. Cut the extra thread off that is left over from tying your knot; try to cut it as close to the knot as you’re able, in order to make it as discreet as possible when woven into your hair.
Put in your own wig cap.
Yank on your wig cap out and extend it out, sliding it on your head. Cover your entire hairline all the way round; the wig cap ought to go about your forehead, ears, and the nape of your neck as little in order to ensure that your braids are completely covered.
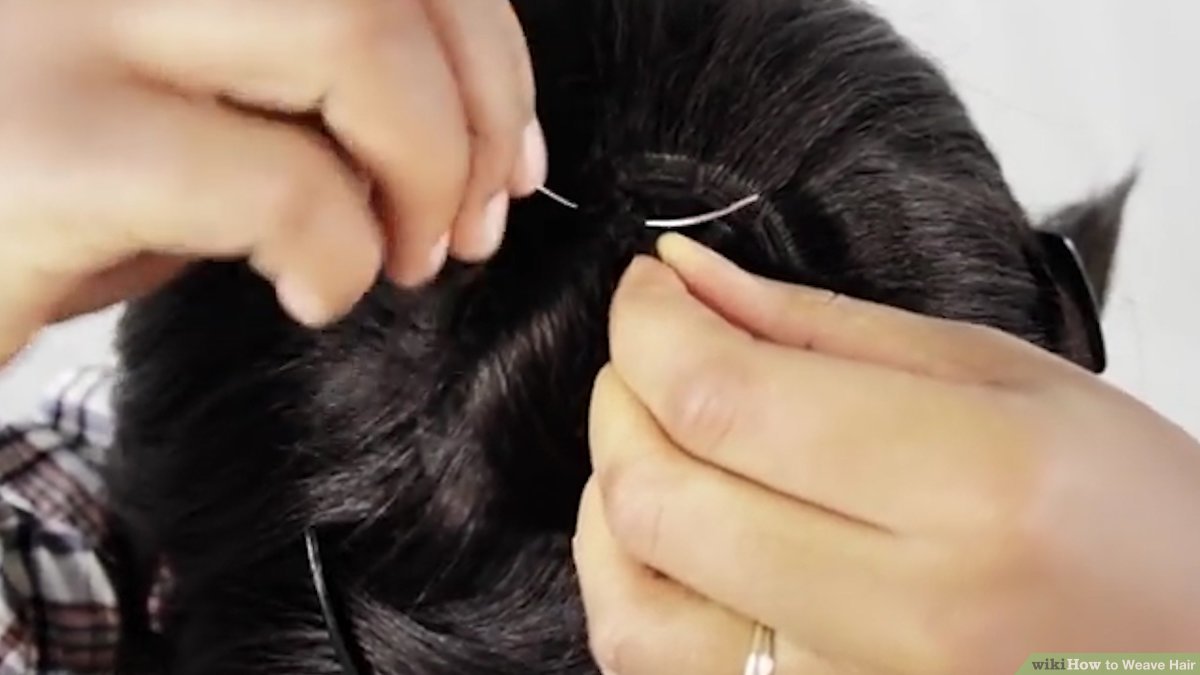
Begin sewing your wig cap to your braids.
Start at the beginning of your perimeter braid close to the area, and pull on the needle under the braid and throughout the other side, pulling the thread taut against the knot. After that, pull the end of the knot outside a bit and pull the 2 strings apart to expose the loop. Wrap the needle across a single edge of this loop and pull it through the center of this loop to create the base knot.
Quantify about 1-inch down the perimeter braid in the first knot you made, and repeat the process. Hook the needle below the braid, pull it through the opposite side, and tug to pull the loose ribbon tight. Ahead of the ribbon between the two knots has been tightened all the way, however, wrap the needle around it twice near where you inserted it, and then pull tight. This will provide you with your next knot. Repeat this same procedure all the way round the perimeter braid.
Sew the wig cap around your part.
When you have stitched the wig cap around the perimeter braid, you’ll finish the ‘loop’ by sewing around the outside of your part. Starting from your last knot on the perimeter braid, skip until another row of braids in your head. Repeat the knot-tying process, then go up to the next row. By the time you’ve sewn around the area, you ought to have a large ‘U’ shape of knots. Make sure each knot is 1-inch from the center part. Finish off by tying two knots at the base of your sewing, where you began on the perimeter braid.
Cut off the excess wig cap.
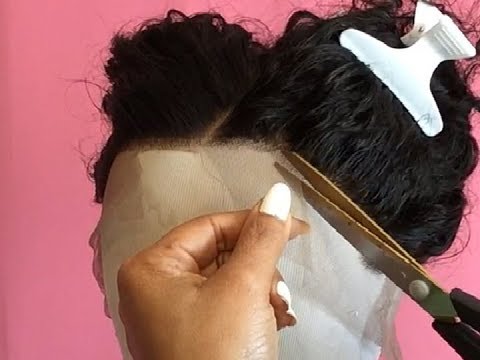
Require your shears and cut up along your part to split the wig cap. As soon as you’ve cut your part, cut all of the excess fabric off as close to the edge of your ribbon as you can, without getting close enough to cut the knots.
Sewing in Your Extensions
Measure your extension-hair for the perimeter braid.
The very first extension that you will measure and apply is the bit that goes around the perimeter. Take your extensions from the bundle, and start a single weft so that the hair is exposed. Starting at the beginning of your perimeter braid, maintain the extension set up, and wrap it round your head. Hold it to the perimeter braid the entire time to be certain it’s the right length. When you get to the close of the perimeter braid on the opposing side, measure a little extra hair, and then trim it to fit.
Quantify the extension to maneuver around the outside of your part.
The second major section of hair you want to measure is the piece that will go around the ‘U’ form of the part. Hold the end of the extension over the beginning of the ‘U’ shaped part close to your forehead, and wrap it around in which you have knotted. When you get to the conclusion on the opposite side (back to your own brow ), add a small amount of additional length to your dimension, and then cut the bit of extension.
Prepare your thread.
You are going to be working with a long strip of extension, however you won’t have the ability to utilize all the necessary thread in one shot. Cut a piece of your Weave Hair Extensions thread that’s 5–6 ft (1.5–1.8 m) long, and then utilize the exact same process as you did for your wig cap by stringing it through the needle, then fitting the ends, and linking them together in a knot. Cut off any excess string.
Create your base knot throughout the weft of the expansion.
Every time you segment a brand new slice of expansion to sew , you are going to have to create a knot to secure it. The extension consists of two key elements: the strands of the hair, and the weft which holds them together. To tie your very first knot, then you’re wrap around the needle, pull it through the weft a second time, wrap the loop that is formed around the needle and pull through the needle.
Begin sewing the extension into a wig cap.
Start at the very beginning of the perimeter braid near your area, and insert the needle through the wig cap, under the perimeter braid, and up through the other side. Pull it tight to bring your extension bit close to your head. Duplicate your knot twice to secure the expansion.
Continue sewing your perimeter extension.
Working with the exact same process as you did to sew the wig cap, then work around your head stitching on the extensions that attach to the perimeter braid. Make each knot about 1-inch apart, and hold the extensions taut so that they are securely attached to a head. Do this all the way around your perimeter braid until you’ve made it to the very end, on the other side of your part.
Sew your expansion round the exterior of the part.
To finish off the ‘border’ of your hair, you are going to need to sew your expansion piece around the border of the ‘U’ shape your wig cap forms around your part. Then use the exact same procedure as explained above to sew the expansion into the braids/wig cap around your part.
Begin filling in the remainder of your head with the extensions.
Starting at the second row of braids (the second to the perimeter braids) you ought to start filling in the distance in your head with the remainder of your extensions. Continue the same procedure as previously, except when you get to the end of your row (on the opposite side of the perimeter braid), then you should use the ‘fold over’ method to start an extra row. This means that instead of cutting off the surplus extension when you reach the end of a row, then you fold it back on itself and then start sewing the new row directly above it.
Finish filling in mind.
Work around your mind, using the specific same procedure of sewing your Weave Hair Extensions to your cap/braids as you’ve been. Don’t forget to double knot above a fold or the beginning of a weft, to properly secure it. When you have finished filling in your head, cut off any surplus that might hang on the front.
Sew in your closure to your part.

If you have completed all your sewing correctly so far, you should be left about 1-inch of vulnerable braids all the way around your part. Sewing your weave on this section is similar to when you initially braided it, as you will be working with little sections away from the part. Sew each small section (roughly 1-inch broad ) onto the exposed braid. This usually means you will have many small pieces to sew, and every should run somewhat parallel to a own forehead. Use the exact same process, making sure to double-knot the beginning and end of each thread.
Produce your closed for the rear of your area.
When you have sewn on extensions to all the small braids together your own part, you should be left having a distance in the trunk that is still open. To fill this in, you are going to have to prepare a unique piece of your weave. Measure the distance which you need to fill, and also cut a piece of your weave that is twice that length. Begin with your regular double knot in the end, then roll the weave in to create a small circle. Make an extra knot by looping around the two layered segments of weft, and pulling it tight. Continue rolling up and knotting the expansion until you’ve completed the whole piece.
Fix your final bit.

Twist your closure bit upside down so that the weft is facing the ground, and the hair is upward. Begin massaging the hair so that it drops down on the top of the rolled up weft. It could be valuable to use a flat iron on the hair to get it to cooperate with everything you are trying to get it to perform.
Sew your close to your head.
Twist your final bit back over so that the weft is exposed, and insert your needle and thread it through to tie your ordinary double knot. Bring your closure to your scalp, and set it where you want it to go. Insert your needle by means of a braid or a piece of weft from another extension nearby in your scalp, and pull it tight to create your regular knot. Continue doing this in a circular movement around your closure bit, until you’ve gotten back to the beginning.
Cut and style your weave.
Attaching your weave into your head is now completed, and that means you have the choice of cutting and styling it to your personal preference. Keep in mind your cut is permanent because your hair is not going to grow inside, so be very careful about cutting your hair. Keep your weave regularly, but avoid washing it too frequently since this might loosen the ties up and your own wig cap.
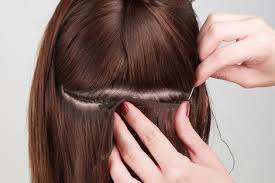
Attach your hair weft
Pick out the hair weave up and attempt to pay for the cornrow with hair weft. Insert the needle beneath the cornrow and pull on the ribbon lightly, leaving a loop. In the event the hair stretched outside of your own hair weft, simply fold it back on the mind as you attach the hair weaves.
Produce a knot
Once you thread your own curved needle throughout your hair, thread the needle through the loop that you left in the conclusion of your final sewing. Pull the ribbon securely to be sure that the hair weaves attached into the hair firmly.
Continue to stitching your own hair package about a 1⁄2 inch from the last sewing. Keep on sewing your expansion over the part line maintaining your backsplash tidy and also a uniform 1/2-inch distance aside.
Finish the sewing
When you’re just one sewing of your hair bundles left, then thread the needle through the front part of the hair bundle and sew both folded ends to one another. Don’t sewing through the hair , make a couple of stitches to fold the folded end onto it. Following that, place your needle through a single stitch, pull it through and make a loop, then place your needle through the loop your made to create a knot.
Reduce your sewn in hair glow if needed
Based on what hairstyle you need and the way you wear your hair weaves, you might have to cut your straightened in hair wefts to receive a new hairstyle and also to assist your hair shinier blend more ideal with your normal hair.